The Task Runner module
The Task Runner is a customizable interface to ACQ4’s task execution capabilities. It allows the user to interactively design and execute a wide range of multi-device tasks including basic patch-clamp stimulation and recording, laser scanning imaging and photostimulation, synchronized multichannel recordings, and complex stimulation paradigms. In this context, the word “task” is used to describe a single, coordinated action to be taken by multiple devices in synchrony. Typically a task involves a short period of recording from electrode amplifiers, cameras, photomultiplier tubes, and other analog or digital channel devices. Arbitrary waveforms may be defined to control stimulation devices, scanning mirrors, and triggering behavior.
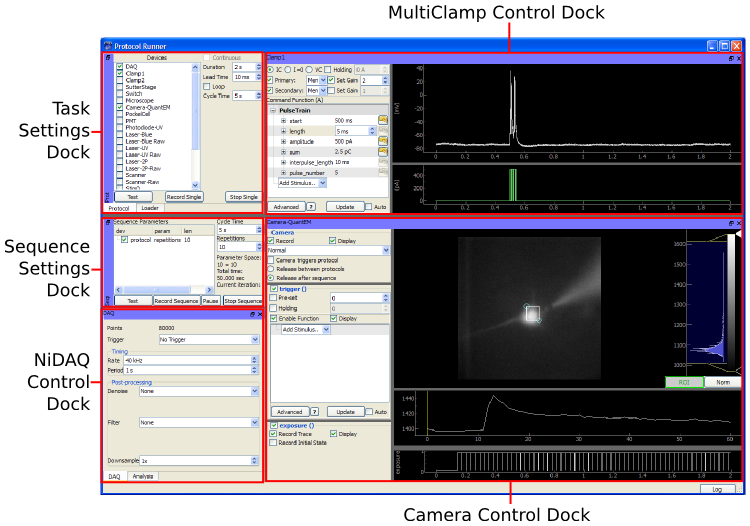
Screen capture of the Task Runner module showing a calcium imaging task with the docks rearranged. The Task Settings and Sequence Settings docks now appear on the left edge, and the Loader Dock is currently hidden beneath the Task Settings dock. Three device control docks are arranged to make optimal use of the available screen space.
When designing a task, the user first selects the subset of devices which should participate in the task. Once selected, each device displays a control panel inside the Task Runner window, and the user may interactively resize, rearrange, and stack each of these panels as needed. Each control panel provides a set of controls for determining how the device will behave during the task, and a set of display areas where the acquired data for that device will be shown. Synchronization between devices is achieved by specifying the control and triggering waveforms used by each device, while the Manager and data acquisition hardware ensure that tasks are executed correctly. Waveforms are specified either by combining predefined elements such as square pulses or by evaluating an arbitrary Python expression that generates the output array. The control panel for each type of device is described in the device documentation.
The Task Runner module also allows the execution of sequences of equal-duration tasks which iterate over multi-dimensional parameter spaces. Typically, variable parameters affect some aspect of a stimulus waveform such as the starting time or amplitude of a pulse. However, each type of device defines the ways in which it can sequence variable parameters. Scanning mirror devices, for example, may define an arbitrary set of photostimulation locations, allowing the same task to be executed once for each location. If multiple sequencing variables are specified, the module executes the task once for each point in the multi-dimensional parameter space. This allows the parametric exploration of arbitrary stimulus spaces in a relatively unrestricted fashion, limited only by the recording time and the size of the data set. Optimized and adaptive parameter space searches are currently not implemented, but are a desirable feature for future development.
See the following tutorials for a guided introduction to using the Task Runner: Record an I/V Curve, Record a Photostimulation Map, Calcium Imaging.
Configuration options
Like all modules, the Task Runner must have one or more entries in the modules section of the configuration file. Each entry will appear as an item in the Manager user interface list of loadable modules. For example, the following configuration defines a single loadable Task Runner configuration:
modules:
    Task Runner:
        module: 'TaskRunner'
        shortcut: 'F6'
        config:
            ## Directory where Task Runner stores its saved tasks.
            taskDir: 'config/example/tasks'
User interface docks
The user interface of the Task Runner is organized into ‘docks’ that may be resized, rearranged, stacked, or torn out to separate windows. When the Task Runner is first loaded, four docks are displayed:
A loader dock for saving and loading task configurations.
A task settings dock where devices are selected and the overall timing of the task is configured.
A sequence settings dock that allows to execute tasks repeatedly while varying one or more parameters of the task.
An online analysis dock allowing the inclusion of analysis modules in the task.
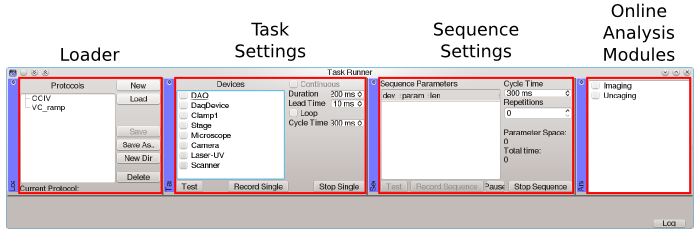
Screen capture of the Task Runner module immediately after it is loaded.
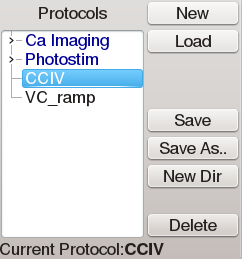
Loader dock
The loader dock is used to load previously saved tasks, create new tasks and save changes to tasks. The file list on the left shows all of the previously saved tasks. Task configurations are stored in the directory specified by the ‘taskDir’ configuration parameter.
To create a new task: Click the “New” button. Add any devices to the task (using the Task Dock, explained in the next section). Then press either the “Save” or the “Save As...” button. Name the task by double clicking the current name (probably something like task_000) and typing the name you want. Note that the name of the task also determines the name of directories that will be created when storing data acquired by this task.
To create a new task based on an existing task: Load the existing task by selecting it in the list and pressing the “Load” button. Make any changes to it. Then, press the “Save As...” button. The “Save As...” button saves that task under the name of the existing task with _000 added to it. The original task is not affected. To change the name of the task, double-click it in the list and type the new name.
To load an existing task: Select it in the list and press the “Load” button. The name of the loaded task will be displayed below the task list.
To make changes to a task: Load the task. Make your changes, then press the “Save” button.
To organize tasks: The “New Dir” button creates a directory allowing tasks to be organized. Move tasks by dragging them between folders.
To delete a task: Select the task and press the “Delete” button twice (after one click, the button text changes to “Really?”).
Task settings dock
The task settings dock shows a list of the devices that may be included in the task as well as general timing settings for the task. Buttons at the bottom of the dock provide control of task execution.
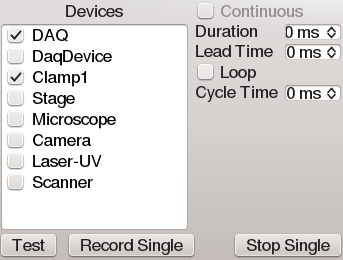
Selecting devices: To include a device in the task, check the box next to the device. For each device that is checked, the Task interface for that device will appear in the lower space of the window. The behavior of the task interface for each device is described in the device documentation:
Any number of devices may be included in the task. Docks may be rearranged and stacked by dragging their title bars.
- Duration Sets the desired length of one trial of the task.
- Lead Time This forces the task system to reserve the selected hardware for the duration specified before running the task. This is useful, for example, for allowing a patch clamp amplifier to settle after switching modes and before making a recording.
- Loop When checked, the task runs repeatedly until the Stop Single button is pressed.
- Cycle Time Specifies the time interval between runs when in loop mode.
- Continuous [not yet supported]
Buttons:
- Test Runs the task once (unless loop is checked) without saving any data.
- Record Single Runs the task once and saves the data in a new sub-directory of the currently selected storage directory. The name of the new sub-directory is determined by the name of the currently-loaded task. For this reason, it is recommended to save newly-created tasks with a descriptive name before recording data.
- Stop Single Immediately aborts the currently running task. Data for this task may be incompletely stored.
Sequence Dock
Once a stimulation/recording task is designed, it is common to repeat that task mutiple times while varying one or more parameters of the task. Each device dock will have its own capabilities for specifying parameters to vary. Any sequence parameters in use will be displayed in the parameter list in this dock.
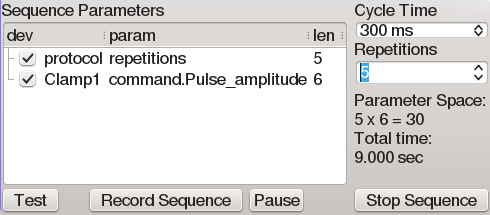
If there are multiple sequence parameters, then executing the sequence will iterate over a multi-dimensional parameter space. The order in which parameters are iterated is defined by the order of their appearance in the parameter list; these may be dragged to modify their order.
Sequence parameters may also be unchecked to temporarily disable sequencing for that parameter. In this case, each parameter specifies a default value to use instead of its sequence values. These default values are also used when running non-sequenced tasks by clicking Start Single or Record Single.
Controls in this dock:
- Cycle time determines the minimum time to wait before starting consecutive tasks within a sequence. If a task execution takes longer than the specified cycle time, then the next execution in the sequence will begin as soon as possible.
- Repetitions creates a sequence parameter which does not affect the state of any devices. This allows tasks to be repeated a specified number of times.
- Test Executes the task sequence without storing data.
- Record Sequence Executes the task sequence, storing data to a sub-directory of the currently selected storage directory. The name of the new sub-directory is determined by the name of the currently-loaded task. For this reason, it is recommended to save newly-created tasks with a descriptive name before recording data. The data for individual task executions are stored in numbered sub-sub-directories.
- Pause When depressed, sequence execution will be paused after the currently-executing task has completed. Task settings changed while a sequence is paused will not affect the remainder of the sequence when it is resumed.
- Stop Sequence Causes the sequence execution to be aborted after the currently-executing task has completed. To stop the task immediately, instead use the Stop Single button in the task settings dock.
Analysis Dock
Lists all available plugins for online analysis. Checking a box will cause a new dock to be displayed with controls determining how the online analysis is to be performed, and display areas for showing the analyzed results.